Are you tired of rising energy bills and worried about power outages disrupting your life? A hybrid solar and battery system could be the answer, offering energy independence and a reliable backup power source for your home.
This comprehensive guide will walk you through the step-by-step process of installing a hybrid solar and battery system. We'll break down the complexities, offering clear, actionable advice to help you understand each stage, from initial planning to final commissioning. A hybrid system integrates solar panels with home battery storage, allowing you to store excess solar energy for later use, reducing your reliance on the grid and maximizing your energy savings. This is particularly valuable for homeowners looking to improve home energy efficiency and embrace renewable energy at home.
Here's a quick tip: Before you even think about panels or batteries, conduct a thorough home energy audit. Understanding your energy consumption patterns is crucial for sizing your system correctly and optimizing your energy savings.
Planning Your Hybrid Solar and Battery System
The first step in any successful installation is meticulous planning. This involves assessing your energy needs, evaluating your site, and selecting the right equipment. A well-thought-out plan is the foundation for a reliable and cost-effective system.
1. Assess Your Energy Needs
Start by analyzing your current energy consumption. Review your past electricity bills to determine your average monthly usage and peak demand. Consider any future changes in your energy needs, such as adding electric vehicles or appliances. This data will help you determine the appropriate size of your solar array and battery storage capacity. Remember, accurate assessment is key to maximizing energy savings and ensuring your system meets your needs.
2. Evaluate Your Site
A proper site assessment is crucial for determining the optimal location and orientation of your solar panels. Consider factors such as: Sunlight: Determine the amount of sunlight your roof receives throughout the year. South-facing roofs generally receive the most sunlight, but east- or west-facing roofs can also be suitable. Shading: Identify any potential shading from trees, buildings, or other obstructions. Shading can significantly reduce the performance of your solar panels. Roof Condition: Ensure your roof is in good condition and can support the weight of the solar panels. If your roof is old or damaged, you may need to repair or replace it before installing solar panels. Space: Ensure you have adequate space for both the solar panels and the battery storage system. Batteries often need to be indoors, in a garage or basement, for optimal temperature control and lifespan.
3. Select Your Equipment
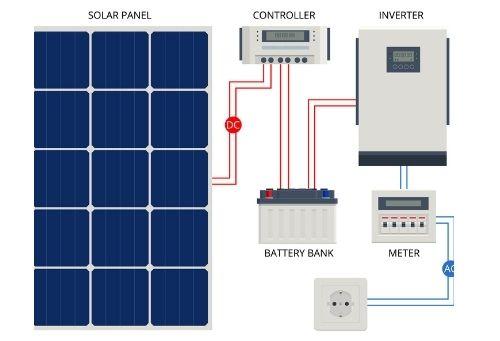
Choosing the right equipment is essential for a reliable and efficient hybrid solar and battery system. Key components include: Solar Panels: Select high-quality solar panels with a proven track record of performance and durability. Consider factors such as efficiency, warranty, and cost. Inverter: Choose a hybrid inverter that is compatible with both solar panels and battery storage. Hybrid inverters convert DC electricity from the solar panels and battery into AC electricity for your home. Battery Storage: Select a battery storage system that meets your energy storage needs. Consider factors such as capacity, discharge rate, battery life, and warranty. Lithium-ion batteries are a popular choice due to their high energy density and long lifespan. Mounting Hardware: Ensure you have the appropriate mounting hardware for your roof type. Proper mounting is essential for the safety and stability of your solar panels.
4. Obtain Permits and Approvals
Before you begin installation, you will need to obtain the necessary permits and approvals from your local government and utility company. This may involve submitting plans, paying fees, and undergoing inspections. Check with your local authorities to determine the specific requirements in your area.
Installing Your Solar Panels
The installation of solar panels is a critical step in the process. It's important to follow the manufacturer's instructions carefully and to ensure that the panels are securely mounted and properly connected.
1. Mount the Racking System
The racking system provides a secure framework for mounting your solar panels. Follow the manufacturer's instructions to install the racking system on your roof. Ensure that the racking is properly aligned and securely fastened to the roof structure. This step is crucial for ensuring the long-term stability of your solar panels.
2. Install the Solar Panels
Once the racking system is in place, you can begin installing the solar panels. Carefully lift the panels onto the racking and secure them with the appropriate mounting hardware. Ensure that the panels are properly aligned and spaced according to the manufacturer's instructions.
3. Wire the Solar Panels
After the panels are mounted, you will need to wire them together. Connect the panels in series or parallel, depending on the requirements of your inverter. Use appropriately sized wiring and connectors to ensure a safe and reliable connection. Be sure to follow all applicable electrical codes and safety regulations.
4. Connect to the Inverter
Connect the solar panel array to the hybrid inverter. This involves running the DC wires from the panels to the inverter and making the appropriate connections. Ensure that the connections are secure and properly insulated.
Installing Your Battery Storage System
Installing the battery storage system involves connecting the battery to the inverter and setting up the necessary controls. This step is crucial for ensuring that the battery is properly charged and discharged.
1. Choose a Location for the Battery
Select a suitable location for your battery storage system. The location should be dry, well-ventilated, and protected from extreme temperatures. Basements, garages, and utility rooms are often good choices. Consider the weight of the battery when choosing a location, as some batteries can be quite heavy.
2. Mount the Battery
Mount the battery according to the manufacturer's instructions. Ensure that the battery is securely mounted and properly supported. Some batteries may require special mounting brackets or enclosures.
3. Connect the Battery to the Inverter
Connect the battery to the hybrid inverter. This involves running the DC wires from the battery to the inverter and making the appropriate connections. Ensure that the connections are secure and properly insulated. Double-check polarity to avoid damage to the battery or inverter.
4. Configure the Inverter
Configure the inverter to properly charge and discharge the battery. This may involve setting parameters such as voltage limits, charge rates, and discharge depths. Consult the manufacturer's instructions for specific configuration details.
Connecting to the Grid
Connecting your hybrid solar and battery system to the grid allows you to sell excess energy back to the utility company and to draw power from the grid when your solar panels and battery are not sufficient to meet your needs. This connection is vital for maximizing energy savings and ensuring a reliable power supply.
1. Install a Meter
Install a net meter that can measure both the energy you consume from the grid and the energy you send back to the grid. Your utility company will typically provide and install the net meter.
2. Connect to the Grid
Connect your inverter to the grid through the net meter. This involves running the AC wires from the inverter to the meter and making the appropriate connections. Ensure that the connections are secure and properly insulated.
3. Obtain Permission to Operate (PTO)
Before you can begin operating your system, you will need to obtain Permission to Operate (PTO) from your utility company. This typically involves submitting an application, undergoing an inspection, and signing an interconnection agreement.
Testing and Commissioning
After installation, it's essential to thoroughly test and commission your hybrid solar and battery system to ensure that it's operating correctly and safely.
1. Inspect the System
Conduct a thorough visual inspection of the entire system, checking for any loose connections, damaged components, or other potential issues. Pay close attention to wiring, mounting hardware, and safety devices.
2. Test the Solar Panels
Test the output of the solar panels to ensure that they are producing the expected amount of energy. Use a multimeter to measure the voltage and current of each panel.
3. Test the Battery
Test the charging and discharging of the battery to ensure that it is functioning correctly. Monitor the voltage and current of the battery during charging and discharging.
4. Verify Grid Interconnection
Verify that the system is properly interconnected with the grid and that energy is being both consumed and sent back to the utility company.
5. Monitor System Performance
Continuously monitor the performance of your system using a monitoring system or app. This will allow you to track your energy production, consumption, and battery storage levels. Regular monitoring can help you identify any potential issues early on and optimize your system's performance. This will allow you to get the most out of your home battery storage and maximize your energy savings.
6. Regular Maintenance
To ensure your system continues to perform optimally and safely, perform regular maintenance checks. This includes cleaning your solar panels, inspecting wiring and connections, and checking your battery's health. Proper battery life and maintenance are crucial for the longevity of your system.
People Also Ask (FAQs)
How much does it cost to install a hybrid solar and battery system?
The cost of a hybrid solar and battery system varies depending on several factors, including the size of the solar array, the capacity of the battery storage system, and the complexity of the installation. On average, a typical system can range from $20,000 to $40,000, but this can vary based on local rebates, incentives, and specific system requirements. It's important to get quotes from multiple installers to compare pricing and find the best option for your needs.
How long will my battery last?
The lifespan of a battery depends on several factors, including the type of battery, the depth of discharge, and the temperature. Lithium-ion batteries, commonly used in home energy storage, typically have a lifespan of 10 to 15 years. Proper maintenance and avoiding deep discharges can help extend the life of your battery.
What happens to my solar system during a power outage?
If your solar system is not equipped with battery storage, it will typically shut down during a power outage to prevent energy from being sent back to the grid, which could endanger utility workers. However, with a hybrid solar and battery system, your battery can provide backup power during an outage, allowing you to continue using essential appliances and devices. Backup power systems provide peace of mind and energy security.
Can I add a battery to my existing solar system?
Yes, it is possible to add a battery to an existing solar system. However, it may require upgrading your inverter to a hybrid inverter that is compatible with both solar panels and battery storage. Consult with a qualified installer to determine the best way to integrate a battery into your existing system.
How do I choose the right size battery for my home?
The right size battery depends on your energy consumption patterns and your desired level of backup power. Consider your essential energy needs during a power outage, such as lighting, refrigeration, and medical devices. Calculate the amount of energy required to power these devices for a certain period of time. This will help you determine the appropriate battery capacity for your needs.
Installing a hybrid solar and battery system might seem daunting, but by breaking it down into manageable steps, you can successfully achieve energy independence and contribute to a more sustainable future. The benefits of energy savings, a reliable backup power source, and a reduced carbon footprint are well worth the effort. Take it one step at a time, and don't hesitate to seek professional help when needed. With careful planning and execution, you'll be enjoying the advantages of your new system in no time.